Import
Bend-Tech 7x Wiki :: Main Menu Bar :: File :: Import
DXF
To import a DXF or DWG file, place the cursor over 'Import' and select 'Data (.dxf / .dwg)' in the list. Choose which file to import in the Import DXF File window. Click 'Open' to open it into an Import Part window.
Die and Material
In the top left corner, a material and die can be selected. The material selection will be shown in the 3D display of the imported part when the 'Preview Part' button is clicked.
To select a material, click the drop down menu below 'Select Material:' and choose a material from the list. Once a material is selected, the diameter, wall thickness, and weight of the selected material will be shown to the right.
To select a die, click the drop down menu below 'Select Die:' and choose a die from the list. Once a die is selected, the CLR, calibrated CLR, and bend location offset of the selected die will be shown to the right. Directly below the Select Die drop down menu, the original CLR of the imported part will be shown after 'Detected CLR:'.
Define
Verify
Settings
Part Details
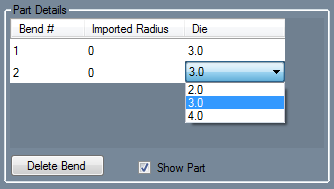
In the top right corner, the part details chart is shown. Once the part has been defined properly and the 'Generate Part' button has been clicked, each bend will be listed with the radius, and a column where each die must be chosen. To select a die for each bend, click on either the die or open space that is currently listed in the Die column. Once clicked, a drop down menu will appear. Click the drop down menu and select a die. To delete a bend, select any of the cells in the bend's row and click the 'Delete Bend' button. If there is only one bend, it cannot be deleted. The part needs at least one bend. After the part has been properly defined and generated, check the Show Part option to generate the part in the chosen material.

